On the Demo tab, users can create customised demographic and demographic groups using a variety of single source categories including age and gender, occupation, presence of children, income and many more. These attributes can be combined to make a single demographic.
To Create a Custom Demographic:
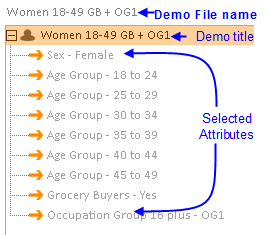
Creating a custom target demographic can be created by utilizing the Demographic and Household Attribute buttons. In the below example, a custom demo of Women 18-49 GB + OG1 will be built.
- Click on Demographic Attribute button, the selection screen will populate with the available attributes select Sex-Female. Once the gender has been selected, on the selected pane, a "New Demo 1" will appear with an Demo
 symbol which will be highlighted in orage to indicate that this is the active demo selection. Each option selected will be displayed under this "New Demo 1". (Note if the custom demo does not require a specific gender, both Sex options can be unselect).
 - Select the Age Group required. If selecting various age brackets, click on the first age bracket then left click+shift key and then select the last age bracket then click on one of the highlighted check boxes.
- Locate "Grocery buyers" and select "yes"
- Locate "Occupation Groups 16 plus and selected "Occupation Group 16 plus - OG1"
- If the new demo is not required for future use, user can rename the "New Demo" by double clicking on the demo symbol which can then be renamed as required. To use the demo for other reports, click on the Save button on the top right. The New Demo 1will be saved at the User level on the file and asset manager where it can be renamed. Once the demo file has been saved, the new title will be reflected in the selected pane.
To edit an existing user created demographic
User can edit their existing demographics as required.
- In the User level in the file and asset manager, double click on required demo for editing. It will then appear in the selected pane.
- In the selected pane, click on the demo so that it is highlighted in orange, this indicates that it is the selected demo for editing
- To remove selected attributes, right click on the unwanted attribute and click on delete. Alternatively attributes can be deselected via the selection pane by simply un checking the check boxes.
- Re-save to rename the demo or Save As to create a copy to retain the original demographic.
To Create a Demographic Group
Users can create a demographic group from existing user, site and supplier demographics or can be created as you create new demographics. The symbol for a grouped demographics is two people  to differentiate from a single demo.
- Select the demographics required to make up a group. Each demographic selected will appear on the selected pane. Where the file name will be title "New Group"
- To save the new demographic file, click on the Save button. The new group will be saved at the User level - name the file as required.
To create an OR and And Demographic
Users can create a demographic with attributes that can be an OR. For example People who have a personal income of 5K-7K or 7K-10K.
- On the selected pane, right click and select "add OR Folder"
- A new demo will appear with an "OR" will appear
- select the attibute required, in this example Personal Income of "5K - 7k"has been selected
- On the selected pane, click on the "OR" tree, this will ensure that the next attribute will be added as an "OR"
- Select the attribute required, in this example Personal Income of "7K - 10K" has been selected.
- Save the demo and give it a name.
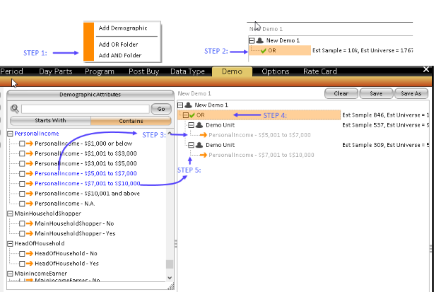
"Or" Demo work flow