When setting up a new Report, or when adding another layout to an existing Report, you will need to design a report layout to view your results. Report design in eTAM XTC is as simple as dragging and dropping various elements from the Layout Assets Slider Bar into the Report Grid as required.
Information can be nested above, below or beside other elements to breakout information where necessary. Different sections can be added into the layout to separate out information.
Many of the options that can be dragged into the layout have their own settings that can be either accessed on a right click in Layout Assets and/or the Report Grid and some can also be accessed via the Settings button in the toolbar.
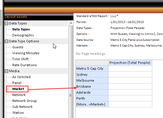
The Layout Assets contains all the elements (or assets) that can be dragged and dropped into any report layout.
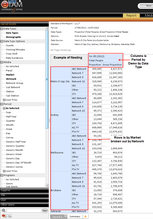
Items can be moved to either:
- the row headers
- the column headers
- the page header or
- the report zone
Item can also be 'nested' meaning that they can be moved above, below, the left or the right of an item already in the grid nesting them together. This is the easiest way to breakout a report (e.g. dragging Market into the rows, then dragging Programs to the right of it will breakout each network by its programs).
To move an element into the report
- Click on the element in the Layout Assets tree
- Holding your muse button down drag the item into the required location in the report grid
- When you are hovering over the spot required (a number of signs will indicate where you are, release your mouse button and the item will be 'dropped' into the location. The item will then appear in bold type in the layout assets tree to indicate that it has been placed into the report.
Breaking information by 'nesting' elements
If you want to breakout information you can 'nest' elements above, below, to the left and to the right of an item already in the report.
Once you have at least one element in the grid:
- Click on the element in the layout assets tree that you want to nest
- Drag it to the location required
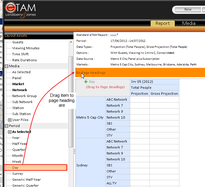
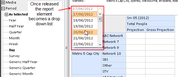
Adding items into the Page Header area to create pages
If a layout asset element is placed into the page header the items within it will be broken out into separate pages. A drop down list containing each of the items within that element appears when you click on the downward facing arrow to the right of the page headings allowing you to select the page required. Pages can also be nested if required.
To Add an item in the Page Header are:
- Click on the element in the layout assets that you want to place into thePage Header area
- Drag it to the top left of the grid where it says in 'No Page Heading'. A thin vertical grey lin will appear to the left of this and a green plus +symbol will indicate that you can place the item here. ("No Page Headings" will not appear if something has already been dragged to the page header area)
- Release the mouse and the item will drop into the Page Header.
A drop box will appear listing the items that are included in the pages and at the top right of the report if will indicate how many pages are created.
|
|
Adding a new section into report
eTAM XTC allows you to add an entirely new section into the same report layout to separate out the information you've selected to display. Colour is used to identify one section from another alternating between green and blue.
To add a new section into a report
- Drag the element from the Layout Asset Button into the layout grid
- Hover your mouse either above or below in rows or to the left or right in the columns - you will know when you are able to drop it into a new section as "(Add to new Section)" will appear beside your mouse.
- Release your mouse button. You will know if it's a new section by the colour - alternatively blue then green.

Editing the placement of an element already in the report grid
You can either move the item around in the report grid - OR - remove it from the grid altogether
If you want to move the element to a different location in the grid:
- Click on the item in the report grid (NOT in the layout asset tree again)
- Drag it to the new location
If you want to remove it from the report grid:
- Click on the item in the report grid
- Drag the item back to the layout assets.
The item will then no longer appear in bold in the layout assets tree.