There are 2 ways to make a period selection at the period tab by using:
- Actual Periods - uses a specific set date or date range. e.g. 15 January 2009, January to December 2009, Quarter 1 2009 etc. They are the default view of the Period calendar. You can tell if you are in Actual periods as it will show a calendar on screen. Future dates are also available here by clicking on the Future Dates button. Future dates will appear with a red background.
- Relative Periods - uses a representative time period relative to the end of the current database date. e.g. Year to Date (YTD), Moving Annual Total (MAT), January -1 (January 1 year back) etc.
To switch between Actual and Relative periods - you need to change the period type option in the Period Sub Menu. Click on the arrow to the right of the Period Type and select from the options. The default setting is Actual Periods.

Note: a report can contain both actual and relative periods in the selection if necessary. e.g. you can run January 2009 from actual and January-1 from relative in the same report.
To create a Period selection with ACTUAL Current database periods
- Make sure the Sub menu has the right option chosen to display what is need in the calendar below - for Actual dates the period type should be set to "Actual Period".
- Make your calendar period selections by clicking or dragging over the necessary date selections within the calendar (items selected will be highlight in orange). You can select by any period block i.e Day, Survey or Year.
- Click on the "Add" button to add to the selected pane - OR-
- Drag the item to the selected pane - OR-
- Double click the item across by double clicking on the period block selected
To create a Period selection with ACTUAL Future date periods
Click on the Future Dates button to the right of the calendar; this will add 24 months (2 years) of future dates to the bottom of the calendar based on the current end of database. The dates have a red background to distinguish them from the current dates.
Adding future dates will not impact upon your current results. They are useful to set-up reports that will utilise them in future - especially if you are going to batch the report. As the selected future dates become available in the system the report will be able to include that date without further intervention by the user.
Future dates will be added into the selected pane with an asterix (*) beside them to indicate that there is no data for these dates yet.
To make future dates selection - ensure Future Dates are show by clicking on the button, scroll down the calendar to the future dates and follow the same steps as per the current database periods outlined above.
Click on the Future Dates button again if you want to hide the future dates in the calendar.
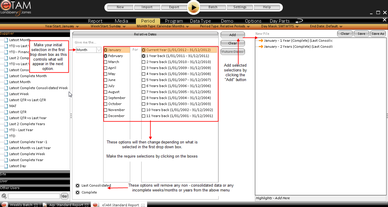
To create a Period selection with RELATIVE periods
- Make sure the Sub Menu has the right options chosen to display what is needed in the calendar below - in particular that Period Type is set to Relative Periods. However you can also set items such as Year Start, Day mask etc. See Period Sub Menu for more information
- Make a selection from the first drop down box and click on the subsequent options within each that you require. The options you click on will have a black cross beside it.
For example, choosing the "Last" option from the first drop down allows you to choose the “last” + “x” + “period type” as your period selection. For e.g. you can add Last + “2” + “years” in your period selection. It has several period type options to choose from such as Months, Surveys, Weeks, etc. - Once the selection is made - click on "Add" button to move the selection into the selected pane