Schedules from third party software providers can be imported into Schedulizer as well as copying from an excel spread sheet.

Importing schedules (.sch files) for :
Post Analysis:
- Launch Schedulizer from the toolbar "New>eTAM>Schedulizer>
- The Schedulizer module will open, to import> go to "File>Import
- Locate the schedule from the menu then click open
- On the Spot Settings Menu, select the required demo. Note that multiple demo can be selected.
- Once a demo has been selected - Schedulizer will automatically calculate the RnF. To view the full results window, click on the green play button on the main tool bar.
Future Campaigns:
Importing Schedules with future dates will be required to map the future dates to an existing survey range.
- Launch Schedulizer from the toolbar "New>eTAm>Schedulizer
- The schedulizer module will open, to import> go to "File>Import
- Locate the .sch file from the menu then click open
- You will get an import error message - click OK on this window. There will be an "date out of range" error colum but it will be removed by following the below steps.
- In the schedulizer toolbar click on the"survey mapping" icon - the Plan Survey Range will appear
- In the Plan Survey Range menu - users have an option to use the "Consecutive weeks from" or map Individual Plan Weeks to Survey Weeks - see image below.
- Click OK once survey mapping is selected to return to the schedule - note that the "date out of range" has disappeared.
- Select a target demo in the Spot settings and run the schedule.
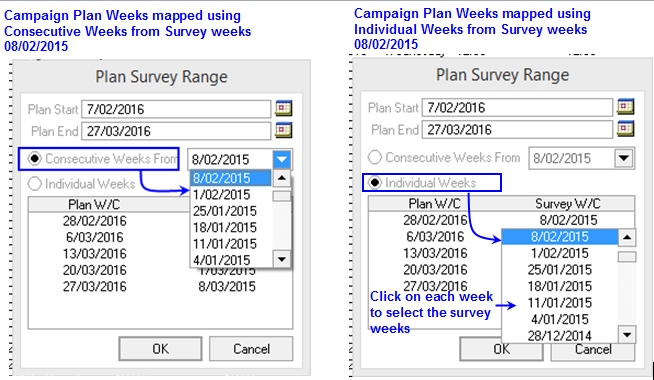
When selecting the survey mapping for the campaign - this will not change the Plan dates shown on the Spot schedule. To see what survey the Plan is using you must click on the Survey mapping tool.
Modifying Spots (Invalid Stations error)
When importing schedules from other software providers; some station codes may not be compatible with eTAM. The below steps illustrates how to modify the station codes in schedulizer.
- After importing a schedule that may have incompatible station codes, an "Import Error" window will appear.
- Hit "OK" on the message box.
- On the Spot Schedule, sort the spot list by station. It will make the following steps much faster
- Stations with an incompatible code will display an "Invalid Station" for example 5241 should be "7Flix" Sydney. Multi select all stations with the same code then right click and select "Modify Spot"
- On the "Modify Multiple Spots" menu, in the Stations drop down, select the correct station e.g "7Flix Syd"
- Then click "OK"
Once the above steps have been completed - the spots selected in step 4 will now display the correct station. Repeat steps 4-6 for the remaining stations.
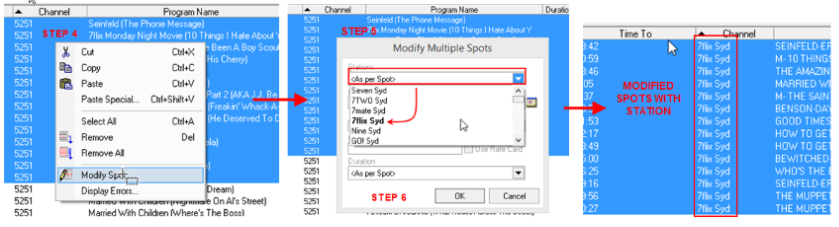
Image Title