Day Part Tab Screen
The day part tab comprises of the File, the two day part creators and the selected pane. The interface will work similarly to other selection tabs whereby users can select saved files from the file and asset manager, selected items will then appear on the selected pane on the right.
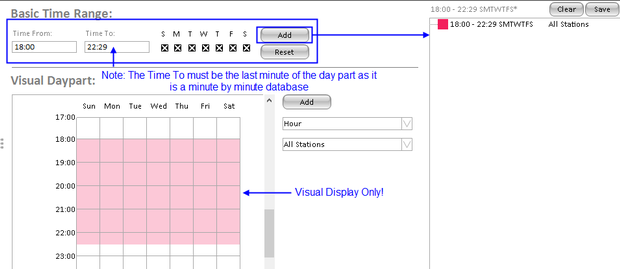
Basic Time Range
The basic time range allows users to create day parts quickly. Users can also apply day masks prior to adding the entered time zone. When a day part is added, the day part grid will "visually" display what time range has been entered. To edit the day part, users will need to use the day part grid, ensuring that the day part is selected (in orange in the selected pane).
Users can only create day part for "All Stations" using the Basic Time Range.
To add a day part:
- In the Time to and Time from fields enter the range required, note that the time format can be 12hour or 24hour. In this example "1800 - 22:29" will be used as shown.
- To exclude days from the range, deselect the check boxes. Then click the "add" button. The time range will appear on the selected pane; the first day part will be in red, and automated name will be generated.
- To edit the day part after it has been added ensure that the selection is active (it's highlighted in orange) - use the Visual day part grid edit by using the right click mouse button.
- Save the day part if required.
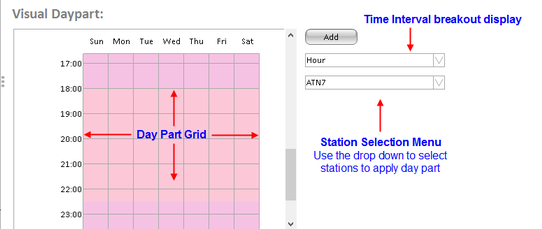
Visual Day Part:
The visual day part builder allows users to create day parts for specific station (s) or all stations. This will provide greater flexibility for reports which require varying time intervals.
The visual day part screen comprises of the following sections:
- Time Interval Menu - changes the displayed time interval in the day part grid from hours to minutes.
- Station Selection Menu - allow users to build a day part for specific stations. The available station list can be filtered by making a media selection in the Media Tab.
- Day Part Grid - time range selection area. If the grid is in 1 hour time intervals, users can select a time range at half hour intervals.
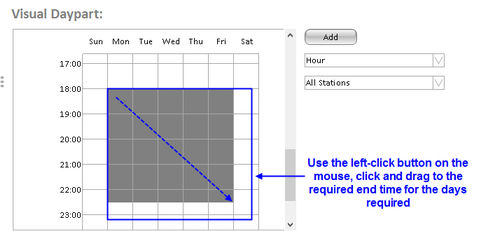
To create a day part:
In this example the day part of Peak Monday - Friday will be created:
-
Within the grid, scroll to the desired time (in this example 6:00pm is the start time and 10:30pm being the end time). If the day part grid is at 1 hour intervals, click the halfway point from (10pm - 10:30pm) within the cell to select 10:30pm. In the image below Monday 6:00pm is the starting point left click and drag the cursor diagonally down to Friday 10:30pm.
-
Then Click the "Add" Button. The day part will now appear in the selected box. To rename right click and select "rename".
To Create a station specific day part:
Station specific day parts is used when different dayparts are required for specifc stations on the same report layout.
- Within the visual day part grid, highlight the day part required in this example 1900 - 1959 Mon - Wed. Then on the station selection menu, select the station that the daypart is applicable to. In this example the day part has been aplied to Fox8.
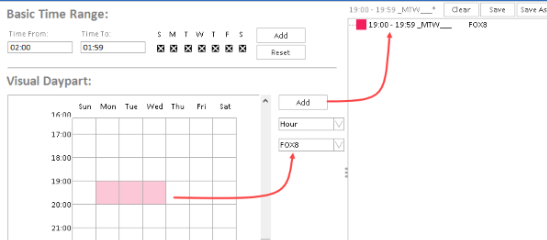
Image Title
- To apply the same day part to another station, click on the newly added station on the selected box, to ensure its the active selection, then repeat step 1. This will add Fox8 +2 to the day part.
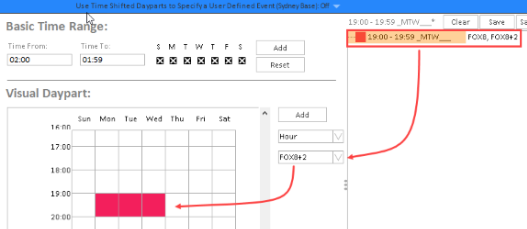
Image Title
- Repeat for the remaining stations.